Introducing The Kitchen for Two!

The Kitchen For Two

After a long absence, I am ready to get back into the kitchen! Although, this kitchen has now expanded to two after a wedding in February! In keeping with the previous theme, I will continue to provide recipes with reduced portions, accommodating cooking in a smaller kitchen but now for two people. New name, new look, same cook! Head on over to The Kitchen for Two to get started! Once on the new site, make sure you subscribe at the bottom to never miss a post from this new journey!

S is for Shells & Squash

s-is-for-shells-and-squash

I hope everyone had a nice Thanksgiving eating all the good foods and spending time with their families! I enjoyed joining my family in the kitchen and cooking a meal that was meant for way more than one person 🙂 As I cannot get enough of comfort food and do not think it should be reserved for one day a year, I bring you squash and shells for the letter S!

This recipe plays off of your basic macaroni and cheese and elevates it with squash and of course bacon! The blended squash lends a creaminess to the cheese sauce and gives it a lovely pop of color. Butternut squash is also a great source of vitamin A and potassium so step aside boxed macaroni and cheese, there’s new dish in town!

Ingredients

  • 1 cup medium pasta shells, uncooked
  • 1 ½ cups cubed butternut squash (many grocery stores sell this pre-cubed that can be cooked directly in the package which helps save on prep time)
  • 1 tablespoon unsalted butter
  • ÂĽ cup vegetable broth
  • 6 tablespoons whole milk
  • ½ cup and 2 tablespoons sharp cheddar cheese
  • ½ teaspoon paprika
  • â…› teaspoon spicy brown mustard (dijon mustard can be used as a substitute)
  • 2 slices cooked bacon, diced (I store bacon in the freezer separated between layers of parchment paper to allow for the ease of adding a slice or two to a recipe)
  • Salt and pepper
  • Fresh parsley for garnish

Prepping the Dish

  • Depending on the form that you purchased your butternut squash in, there will be two different routes of prep you can take:
  • If you purchased pre-cubed squash that can be steamed directly in the package, cook the squash according to the directions on the package.
  • If you purchased a whole butternut squash, peel, remove the seeds and cube the squash. You will then need to boil the squash until tender.
  • While the squash is cooking, cook your pasta according to the instructions on the package.
  • Drain the pasta and set aside in a bowl.
  • Using the heated pot that the pasta was cooked in, melt the butter; turn the stove on low heat if additional heat is needed to melt the butter completely.
  • Add the cooked squash, melted butter, dash of salt and pepper, vegetable broth, paprika, milk and mustard to your blender or food processor. Blend until smooth.
  • Put the noodles back into the pot and pour in the butternut squash sauce.
  • Add the cheese and diced bacon and stir until the cheese has been fully encorporated and melted throughout.
  • Salt and pepper to taste.
  • Garnish with parsely and dig in!

Recipe heavily inspired from The Recipe Critic

R is for Ricotta Cheese

R is for Ricotta Cheese

We have made it to the eighteenth letter of the alphabet! Say hello to the letter R. I knew exactly what I wanted to make when I got here and am so excited to share a quick and easy recipe for ricotta cheese today!

When asked what my favorite food is my answer is cheese; not a particular cheese, ALL cheese. I love how there are so many different variations of this food and how easy it is to change it up by substituting a different milk or aging process. When a cheese shop opened down the street from my apartment (thank you Cheesemongers), I looked for any excuse to walk over and peruse the cases of cheese and listen to the experts describe each wedge, where it originated from, its ingredients and how it was made; I could literally spend all day there! While I am not ready to go into the cheese making business in my little apartment (my closet space is limited as it is), there is one cheese that can be made in even the smallest of kitchens and that is ricotta cheese.

Ricotta cheese is traditionally made by adding an acid to leftover whey from milk and heating it until small curds start to form. This quick and easy recipe brought to you by Serious Eats uses fresh milk, but produces a similar result and is so quick that it is definitely worth a try. After I made a single-serving lasagna a few months ago and had trouble finding a small container of ricotta cheese, I turned to the internet for a solution. Turns out making ricotta cheese at home is a regular practice by home cooks, but this particular recipe steps it up a notch by making it even faster and with little clean-up. How you ask? This cheese is made in the microwave! By heating the milk in the microwave, you avoid milk boiling over onto the stove (a not so fun accident to clean up) and it gets the job done in about five minutes. Cheese in five minutes! I might have stumbled onto a dangerous habit….

I must admit, it took me three tries and an extra trip to the grocery store to get this recipe right and it all had to do with impatience. Yes, even with a five-minute cook time I still jumped the gun too early twice and tried to remove the oh so too small curds. Luckily this recipe has three ingredients and I only had to buy the milk twice so at least it was a cheap lesson to learn. Some tips from my experience are as as follows:

  • When it says gently stir after you microwave the mixture, it means gentle. In my first attempt, I dove right in with my wooden spoon and gave it a good stir. Wrong move on my part! You need to very carefully move your spoon around in the liquid to see the status of the curds forming. You might not even need to stir it at all because once the curds are large enough to remove, you can see them with pretty well.
  • Heat the mixture for the appropriate time before trying to remove the curds. Since microwaves do vary, I went with the lowest time setting of two minutes first and was so amazed with the little curds that had formed I thought it was done. Wrong again! After trying to remove very small curds with my slotted spoon, I had agitated the mixture too much and no further curds would form. On the second time around I tried three minutes and while the curds were slightly larger, they were not quite there yet. The third trial proved to be a success after heating the milk mixture for five minutes.
  • Use a slotted spoon to remove the curds and do not pour the entire contents of the liquid measuring cup into the paper towel-lined colander. After my heating attempt had failed on my first try, in a last effort to remove the small curds, I dumped everything into the prepared colander. Turns out paper towels are quite effective in keeping the moisture in when the volume is high. The purpose of the paper towels are to remove leftover liquid slowly from the curds as they sit which did prove efficient when it was just the curds.

Of course, all of my mishaps could have been avoided if I wasn’t so eager to see the results. Following the recipe step by step will effortlessly produce about a 1/2 cup of creamy ricotta cheese, just the right amount for a single-serving. I hope you enjoy this cooking venture as much as I did and I would love to hear about your results in the comments below. Try your freshly made ricotta cheese in a lasagna or on a flatbread!

Learn about the cheese making process and how this recipe was developed here!

Get straight to cooking and view the recipe here!


Q is for Quinoa Breakfast Bowl

Q is for Quinoa

Happy Friday readers! Any fun plans for the upcoming weekend? Whatever you have planned, this quinoa breakfast bowl is sure to fuel you up!

Quinoa has gained popularity in the past few years and it’s no surprise why. This edible seed is high in protein, fiber and antioxidants, and as an added bonus, it is gluten-free. I like to cook up a large batch of quinoa at the beginning of the week and toss it into salads and wraps for lunch as it keeps me fuller longer due to its amazing properties. Why limit yourself to lunch though? Quinoa is great for breakfast and when topped with an egg and fresh salsa, you’ll be sure to add this into your morning recipe rotation. This quick quinoa (bonus points for two q’s?) breakfast is a great way to use up any veggies, cheese or meat in the fridge; there are no limits to your breakfast creation!

Happy weekend adventures!

Suggested Bowl Ingredients

  • 1/2 cup cooked quinoa
  • 1 egg, cooked over-easy
    • Can’t flip that egg yet? Practice makes perfect and the key is to flip with confidence, you’ll get it! In the meantime, a scrambled egg works just as well!
  • 1/2 an avocado, sliced
  • 2 pieces of cooked bacon, roughly chopped
  • Salsa of choice
    • I made a quick fresh salsa from diced tomatoes, diced sweet peppers, diced pineapple and a squeeze of lime juice. Adds a nice freshness and crunch!
  • Sprinkle of paprika

If you are a fan of quinoa, make sure to try these quinoa patties too!

P is for Pie

P is for Pie

I know, I know, I already did a post for the letter P, but I couldn’t help myself! I had so many recipes to choose from that I just couldn’t narrow it down to one so you get two recipes for the price of one. You’re welcome 🙂

I enjoy a good pie, but find that I only get to eat them at large gatherings. Well readers, I bring you hand-held pies that can be prepped and frozen and then popped in the oven whenever the craving strikes! These pies are bursting with blueberries and can be prepped in under twenty minutes when using pre-made pie dough. One important tip when putting together these pies is to work as quickly as you can. When you add sugar to berries, the juices from the berries start to extract which is great when making a berry shortcake, but not when making a pie to freeze as that juice will form ice crystals and could create sogginess in the final pie product.

Add these pies to your weekend food prep and you can reap the benefits for weeks to come! Happy Sunday!

Ingredients

  • 1 round 9-inch pre-made pie dough sheet (I used Pillsbury, but this recipe will also work with homemade if you want to put in the extra effort and have a favorite recipe)
  • Flour for dusting counter/cutting board to prevent pie dough from sticking
  • 1 cup of blueberries
  • 1 ½ teaspoons fresh lemon juice
  • ÂĽ teaspoon lemon zest
  • ÂĽ teaspoon orange zest
  • 2 tablespoons white sugar
  • Sprinkle of cinnamon
  • Pinch of kosher salt
  • When ready to bake, you will need one egg and a pinch of raw sugar

Prepping the Pies

  • Rinse and dry blueberries, taking care to pick out any stems or berries that are past their prime.
  • In a medium bowl, toss blueberries with the lemon juice, lemon zest, orange zest, white sugar, cinnamon and salt.
  • Place the pie dough on a flour-dusted surface and cut it into six triangles.
  • Pile the filling evenly between the six pie pieces on one half of the dough, this will create an easier job when it comes time to fold them.
  • Dip your fingers into water and lightly brush the edges of the pie dough before folding to create a better seal.
  • Gently fold one half of the pie dough over the filling and press to seal the edges. If you want to create a decorative edge, you can use the tines of a fork to press down and seal.
  • Place the prepared pies on a parchment lined sheet pan and cover with plastic wrap.
  • Place the pies in the freezer for four hours and then transfer to a freezer-safe bag to store.
    • I suggest writing the below information on the freezer bag so you have the baking instructions on hand when you are ready for pie!
  • When you are ready to munch on one of these hand-held pies, preheat your oven to 425F and put the sheet pan in the oven.
    • Putting the sheet pan in the oven while it preheats will help create a crispy crust for your pie.
  • While the oven is preheating, whisk one egg in a small bowl to create your egg wash.
  • Pull out one pie and place on a piece of parchment paper. Brush the top of the pie with the egg wash and sprinkle with raw sugar. Carefully create a ½-inch slit on the top of the crust to allow for steam to escape during the baking process.
  • Put the pie with the parchment paper in the oven on the warmed sheet pan and bake for 10 minutes at 425F.
  • Reduce the heat to 350F and bake for an additional 10 minutes until the crust is golden brown and the filling is bubbly.
  • Allow the pie to slightly cool on a cooling rack before enjoying!

Inspirations for this recipe: Bon Appetit, Fine Cooking, and Foodie with Family

P is for Panzanella

P is for Panzanella

I am so excited to share today’s recipe! This recipe has been on my list since I started this alphabet venture so without further ado, today I bring you panzanella!

Panzanella is a great way to celebrate and highlight the tomato in a fresh summer salad. This Italian dish is great for a light lunch or dinner and requires little prep, definitely the number one priority when cooking in the summer heat. Tomatoes, bread, basil and a light dressing, what more do you need? A touch of burrata couldn’t hurt 🙂 I hope you enjoy this salad as much as I do!

Ingredients

  • ½ teaspoon kosher salt
  • 8 ounces mixed mini heirloom tomatoes or 8 ounces assorted tomatoes
  • 1 ½ cups cubed sourdough bread
  • 2 ½ tablespoons olive oil, divided (½ and 2)
  • ½ tablespoon minced shallot
  • 1 garlic clove, grated
  • â…› teaspoon dijon whole grain mustard
  • 1 ½ teaspoons red wine vinegar
  • 2 tablespoons chopped basil (approximately 4 leaves)
  • Suggested side serving: burrata cheese topped with a drizzle of olive oil and sprinkle of salt and pepper

Making the Panzanella

  • Slice the tomatoes into bite-sized pieces and place in a colander.
  • Sprinkle the salt over the tomatoes and toss to coat evenly.
  • Set the colander over a bowl to catch the drippings and leave to rest at room temperature for about 15 minutes, tossing every few minutes.
  • While the tomatoes are resting, preheat your oven to 350F and bake the bread for 10 to 12 minutes, taking care not to let it brown.
  • After the tomatoes have drained, whisk in the vinegar, shallots, garlic, and whole-grain mustard.
  • Continue whisking and slowly incorporate the remaining two tablespoons of olive oil.
  • Salt and pepper dressing to taste; taste the dressing before adding either as you may only need a bit of pepper.
  • Toss the toasted bread with the dressing and basil in a medium bowl and let it sit for 20 minutes or until the dressing has been completely absorbed. During the 20 minutes, toss occasionally to continue to coat the bread.
  • Grab a fork and enjoy!

*Original recipe featured on Serious Eats

O is for Olive Tapenade

O is for Olive Tapenade

The olive. Growing up my only exposure to olives was on pizza and a bowl full of them on the holiday table, both applications of which I despised. As an adult, I can definitely tolerate their presence in a dish, but they are not my go to. After visiting an olive grove in Ojai this past March and learning about how olive oil is made, my appreciation for these little guys grew. So for the letter O I bring you olive tapenade!

First things first, what is a tapenade? Tapenade is a French spread that consists of olives, olive oil, capers and anchovies. That’s right folks, this dish is typically made with anchovies, coincidentally another pizza topping I don’t quite understand. Fear not, I have omitted the anchovies from this recipe so you can drive on forward without caution. While I am sure they lend another element to the spread, for someone who does not eat anchovies on a regular basis, it did not make sense to purchase a whole can just to use one and have to toss the rest. Let’s be practical in our kitchens as well!

Olive tapenade is really easy to make and does not require any cooking! Sigh of relief for those of you melting in this summer heat. All ingredients are placed in a food processor, blender or can be hand chopped to combine into a wonderful spread that has many uses. You can use it to elevate your sandwich to replace that mundane mayo, spread it on leftover bread for a quick snack, toss with pasta in place of pesto next time, or whisk with additional olive oil and lemon juice to create a quick dressing. Olives are also high in anti-oxidants and have anti-inflammatory benefits so use this as a way to ease them into your diet if you are not a number one fan yet.  Show some love to the olive today and happy munching!

Ingredients

  • 2 cups of assorted olives (many grocery stores have an array of olives near their salad bars that you can choose from and add into one container)
  • 2 small garlic cloves
  • 1 tablespoon capers
  • 2 basil leaves
  • 1 tablespoon lemon juice
  • 2 tablespoons olive oil
  • Salt and pepper to taste (use salt sparingly as olives have an innately salty taste)

Making the Olive Tapenade

  • Remove the pits from the olives. To do this, you can use the flat end of a large knife to slightly “squish” the olive to crack the skin and reveal the pit. Some olives are firmer than others and you may have to slice around the pit and remove the olive meat by carefully picking it off. Since we are going to pulse the olives, they do not need to look pretty by any means. If you are lucky enough to have a cherry pit remover, that works great on olives too, but I do not suggest buying one just for this as it is somewhat of a uni-tasker.
  • In a food processor or blender, pulse the olives, garlic, capers and basil leaves until roughly chopped into small bits.
    • You can also chop by hand to have a more rustic tapenade with slightly large pieces if you do not have a food processor or blender.
  • In a small bowl, whisk together the lemon juice and olive oil.
  • Slowly drizzle the lemon-oil mixture while pulsing the olives to combine. Once the liquid has been incorporated, you can stop pulsing or if you would like an even smaller chop on the olives, continue to pulse until you have reached the desired consistency.
  • Season with salt and pepper to taste.
  • Store in an airtight container in the fridge with a small layer of additional olive oil on top for up to 3 weeks.

Featured serving suggestion: toss a tablespoon of tapenade with pasta, fresh tomatoes and basil for a light, quick dinner. If your pasta is sticking, drizzle additional olive oil.

N is for (Fig) Newtons

N is for Newtons

And I’m back! I apologize for my month-long hiatus, there were a few early summer trips (family cruise to the Bahamas and Seattle wedding adventure with the boyfriend) mixed in with wrapping up the school-year at work. But I am happily back in the kitchen and I bring you one of my favorite cookies to bake for the letter N, (fig) newtons!

Do you love this store-bought treat? Yes?! Then you are going to be as obsessed as I am with this homemade goodie! This recipe is brought to you from one of my favorite cookbooks, Make the Bread, Buy the Butter by Jennifer Reese. She elevates this childhood cookie with a thick layer of fig jammy goodness in the middle and a just as soft cookie on the outside. While this recipe is a bit time-consuming as the dough needs to rest at least an hour to set, they are well worth the effort! I make these as gifts for people all of the time and they could definitely be added into your holiday cookie rotation. They go AMAZING with a cup of coffee and SHOULD be eaten for breakfast when you make a batch. It’s the right of the baker, go ahead, you deserve it 🙂

Newtons all in a row

Ingredients

Cookie

  • 2 cups of all-purpose flour
  • 1 cup of whole-wheat flour
  • 1 teaspoon baking powder
  • 1/2 teaspoon baking soda
  • 1 teaspoon kosher salt
  • 8 tablespoons unsalted butter, softened
  • 1/2 cup brown sugar, firmly packed
  • 1/2 cup white sugar
  • 1 large egg
  • 1/4 to 1/3 cup whole milk

Filling

  • 1 pound dried brown or black figs, about 3 1/2 cups
    • I usually find that black figs are more readily available at your local grocery store.
  • 3/4 cup white sugar
  • 2 tablespoons lemon juice, about 1 lemon

Special Equipment

  • Stand-up or hand-mixer
  • Food processor or blender
  • Rolling pin

Baking the Newtons

  • Whisk together the flours, baking powder, baking soda and salt.
  • In the large bowl of stand-up mixer, beat the butter with the white and brown sugars until light and fluffy. Scrape down the sides of the bowl.
    • A hand-mixer can be used for this as well.
  • Add the egg and continue to beat, scraping down the sides, until the mixture is fully combined and creamy.
  • On the lowest setting, slowly beat in the dry ingredients, taking care not to over mix.
  • Slowly add in the milk, starting with the smaller amount, and blend to form a soft workable dough.
    • Do not add all of the milk at once as the dough could become to moist to knead.
    • If the dough seems too dry, you can add additional milk, up to two tablespoons.
  • Once the dough has come together, put it onto the counter lined with parchment paper and knead a few times.
  • Shape the dough into a disk, wrap in plastic wrap tightly and refrigerate for at least one hour.
  • Thirty minutes before you are ready to pull out the dough, start to prepare the filling.
  • Cut the stems off of the figs.
    • I find that running the knife under hot water helps it to not stick as much.
  • In a medium saucepan, add the prepared figs, sugar, lemon juice and 1/2 cup water. Gently stir to combine.
  • Over medium heat, simmer the mixture for about 10 minutes until the figs have softened.
  • Carefully pour the figs and juices into a food processor and blend until you have a thick, jammy mixture.
    • Depending on the size of your food processor, this may need to be done in batches. If you do not have a food processor, a blender does work, but is harder to get all of the jam out of. The recipe book also suggests allowing the figs to cool slightly and chopping them with a knife to create the filling as an alternative to the food processor.
  • Cool the jammy mixture to room temperature so that it is easy to work with your hands, but you do not want to let it cool longer than thirty minutes as it will become stiff.
  • Preheat the oven to 375F when you are ready to assemble the cookies.
  • Split the dough in half and working on a lightly flour surface, roll out to roughly a 15 inch by 6 inch rectangle that is about 1/4 inch thick.
  • Trim the edges so that they are even, you can use a pastry cutter, pizza cutter, or a knife to do this.
    • Reserve the scraps to patch up any holes.
  • Mound half of the filling in the middle of the dough, stopping 1/2 inch from the top and bottom. The filling should be about two inches wide and one inch high.
  • Carefully lift one long side of the dough and fold it over the filling. It is easier to do this using a bench scraper or wide spatula.
  • Fold the other side of the dough overlapping by about a 1/4 inch and press gently to seal. Seal each end as well by pinching the edges.
  • Now comes the tricky part, carefully and quickly lift the dough using a spatula or bench scraper and put it onto a parchment-lined baking sheet. Roll the dough over so that the seam side is facing downward.
  • Using the dough scraps, patch any holes that might have formed when the dough was transferred to the baking sheet.
  • Repeat the above steps using the remaining dough and filling.
    • I can usually create two large cookies and one smaller one with the dough scraps and a bit of reserved filling.
  • Bake for 12-15 minutes until the dough has turned a golden brown and the top has firmed.
  • Cool the cookies on a cooling rack to prevent further baking.
  • Cut the cookies while they are still warm. If you let them cool throughout you will have a hard time cutting them without the cookie cracking.
  • Slice the cookie horizontally into 1-inch bars. I find that a serrated bread knife is the best tool to use for this, but really any knife will do in a pinch. I also keep a paper towel that has been run under warm water handy to wipe off any jammy filling as I cut to prevent the knife from sticking.
  • The cookies can be stored at room temperature in a sealed container for 5 days…I find they get eaten up by cookie monsters well before then though 🙂

*Recipe from Make the Bread, Buy the Butter by Jennifer Reese

Make the Bread, Buy the Butter

M is for Moules Mariniere (aka Mussels)

M is for Mussels

We have made it halfway through the alphabet! This has been a fun project so far and I am looking forward to tackling the second half of the alphabet although the letters are going to get a bit trickier (any ideas for the letter x?!). These past few weeks have been quite busy with work and life in general so I was looking for an inexpensive, easy week night recipe for the letter M so I turned to my trusted friend the mussel. Mussels are quick to prepare, taste amazing and if you increase the recipe quantities, you can impress guests with your “fancy” cooking skills.

My favorite way to enjoy mussels is the French dish Moules Mariniere. The mussels are served in a broth of simple ingredients that compliment their flavor and can (SHOULD) be eaten with a large slice of crusted bread, the perfect vessel to enjoy the broth! Never cooked mussels before? Not a big deal! Other than cleaning them, there is not much to it as they steam in the broth after you add them and open up all on their own. In the instructions I have included a link to a detailed article on how to clean and debeard the mussels. After one shot you will become a pro and this recipe is sure to make it into your summertime meal rotation. Bon appétit!

Ingredients

  • 1 tablespoon unsalted butter
  • ½ leek, white and light green parts only, thinly sliced
  • ½ small shallot, minced
  • 2 garlic cloves, minced
  • 1 bay leaf
  • large pinch of salt and pepper, add more to taste
  • ½ cup white wine
  • ½ lemon, juiced
  • ½ cup clam juice
  • ÂĽ cup water
  • ½ pound mussels (I suggest buying these the day of to ensure freshness)
  • 1 tablespoon heavy cream
  • 2 tablespoons minced parsley
  • ½ cup grape tomatoes, halved
  • crusted baguette

Making the broth and mussels

  • First you need to clean your mussels. Most mussels from the store come debearded, but there may be a few pesky ones left. Fair warning, mussels are alive so if one starts to open, don’t be alarmed (I may or may not have freaked out the first time I made mussels…). Here is a detailed article on how to clean, debeard, and sort through the mussels for any that could be dead. Be brave, I know you can do it!
  • Once the mussels are prepped and ready to go, store them in a bowl over ice in the fridge until you are ready to cook them.
  • Moving onto the broth, in a medium saucepan over low heat, melt the butter and saute the sliced leeks, shallots, bay leaf, garlic, salt and pepper for 6-7 minutes until soft, but not browned; stir occasionally.
  • Increase the heat to medium-high and add the wine and lemon juice, bring to a boil and reduce the liquid until about half of it has evaporated, this takes approximately 3 minutes.
  • Add the clam juice and water and bring to a boil.
  • Reduce the heat to medium, carefully add the mussels and cover to steam for 2 minutes.
  • Add the parsley, tomatoes, cream, cover and cook for an additional 3-4 minutes until the mussels fully open.
  • And that’s all there is to it! Simple steps to a tasty meal that MUST be served with toasted baguette to sop up all of the broth goodness!

Influenced by: Serious Eats and Spoon Fork Bacon

L is for Lasagna

L is for Lasagna

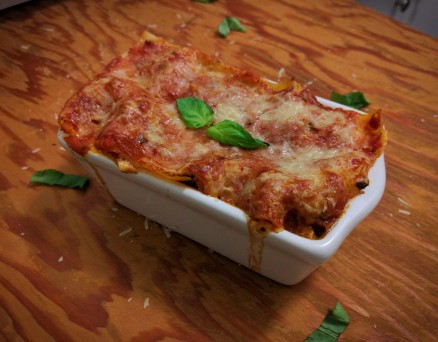
In a kitchen for one, cooking large family-style dishes seems like a daunting task. What if I don’t want to eat the same meal for five days straight? What if it doesn’t freeze well? I took on the challenge of conquering one of my favorite family-style dishes and made it into a single serving. Today we master lasagna!

The key to sizing down your favorite dishes is having properly sized cookware. If you are just going to be cooking for yourself most of the time, I suggest buying smaller pans, pots and casserole dishes. They take up less space in your kitchen, cost less money and allow you to cook smaller meals, wins all around! I chose a 3x5x2 inch ceramic dish that I use for not only making casseroles, but baking small loaves of bread as well. Most of the tools and dishes in my kitchen serve many purposes, no uni-taskers here!

Now that you are equipped with the proper tools, let’s build a lasagna! The key ingredients in a lasagna are marinara sauce, cheese, pasta, and more cheese. I added in some protein and of course basil to turn up the Italian dial on this dish. Lasagnas require little time in the kitchen and thanks to a new tip I read on Serious Eats, I now know how to make it without having to cook the pasta ahead of time; no more handling boiling hot noodles! Rather than cooking the lasagna noodles, I soaked them in warm water. This helps to soften the noodles without actually cooking them. The noodles can then be used to make the lasagna and will finish cooking while it bakes. Why can’t we just add the uncooked pasta as is? It would soak up ALL of the liquid from your sauce leaving you with a dried out brick of pasta and cheese, not quite what you were picturing for dinner I’m sure. To learn the science behind why this soaking technique works, read the Serious Eats article here. I am all about time-saving techniques and this will be one I use from now on for baked pasta dishes!

After your pasta has been prepped and the sausage cooked, it is just a quick layering game and off into the oven your lasagna goes! Swap out the sausage for another cooked protein or feel free to add in other veggies like zucchini, spinach, or roasted red peppers. When adding additional ingredients, be aware of the size of the dish you are using as you do not want to get to the second layer and realize you have run out of space.

There you have it! A beloved Italian family-style dish sized down for just you 🙂 What are you favorite ingredients to layer in a lasagna? Is there a casserole you would like to see sized down for a single serving? I would love to hear your suggestions in the comment section below!

Ingredients

  • 1 cup homemade or store-bought marinara sauce
  • 2-3 lasagna noodles
  • 1 spicy Italian sausage (removed from casing)
  • 4-5 large basil leaves, torn into large pieces
  • ½ cup ricotta cheese
  • 2-3 tablespoons shredded parmesan cheese
  • Special equipment: small casserole dish measuring 3x5x2 inches; if using a larger dish, increase the ingredient quantities exponentially (if dish is twice as large, double the ingredients, etc.)

Building the Lasagna

  • Preheat your oven to 375F.
  • Place the lasagna noodles in a shallow dish with warm water for 10 minutes, changing out the water after five minutes.
  • Drain the water and pat the noodles dry.
    • This process of pre-soaking the pasta helps to soften the noodles, but allows you to easily handle them and helps prevent overcooking them.
  • While the pasta is soaking, cook the Italian sausage over medium-high heat in a small pan breaking it into small pieces while it cooks for 5-7 minutes until browned throughout.
  • Remove the cooked sausage from the pan and place on paper towels to absorb some of the excess grease.
  • Cut the lasagna noodles into pieces that fit the dish, you will need enough to make three pasta layers.
  • Add a few spoonfuls of sauce into bottom of pan to prevent the pasta from sticking.
  • Place one layer of noodles, a few spoonfuls of sauce, half of the sausage, half of the  basil leaves, half of the ricotta cheese, and top with another few spoonfuls of sauce.
  • Repeat the step above one more time to create two layers of filling.
  • Top the second layer of filling with a third layer of lasagna noodles, the remaining sauce and sprinkle with the parmesan cheese.
  • Place casserole dish on a raised edge sheet pan, just in case the sauce bubbles over, and bake for 30 minutes.
  • Allow lasagna to cool for 5 minutes before digging in!